grace grits and gardening

ramblings from an arkansas farm girl

  • Home
  • Bio
  • Publishing
  • SHOP!
  • Garden
  • Food
  • Reading & Books
  • Sunday Letter

a new twist on flower frogs

August 9, 2014 By Talya Tate Boerner

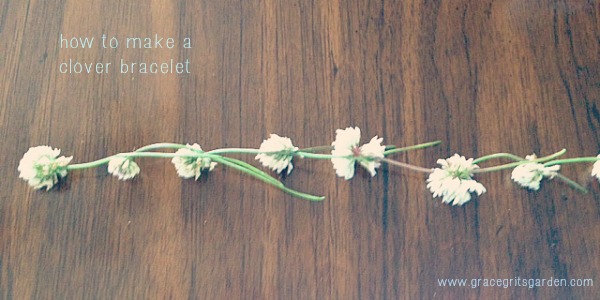
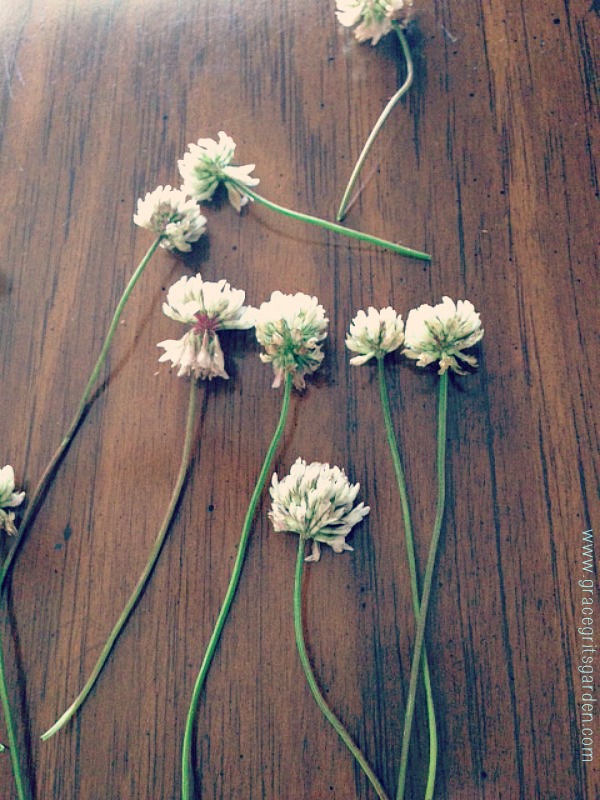
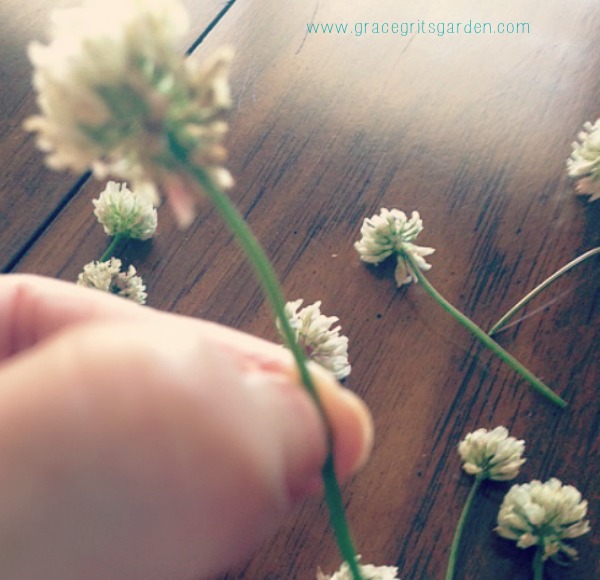
This is a frog in a flower.

frog and flower (morgueFile)

via Chamomile @ morgueFile

These are flower frogs.

vintage flower frogs

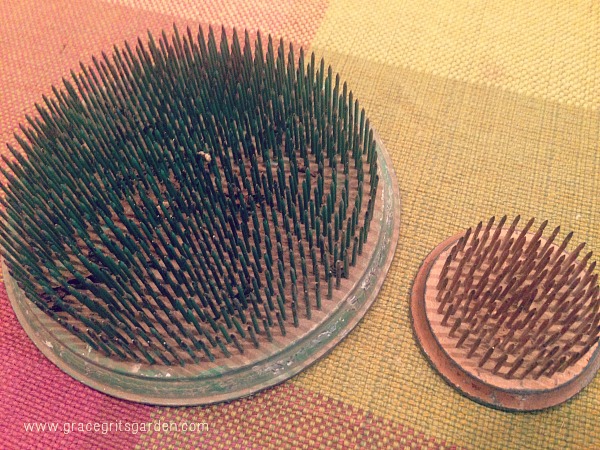
Note the differences. ◕‿◕

I’ve begun collecting flower frogs. (My mother, on the other hand, collects the amphibian sort in her bathroom on the farm—a whole other story.)

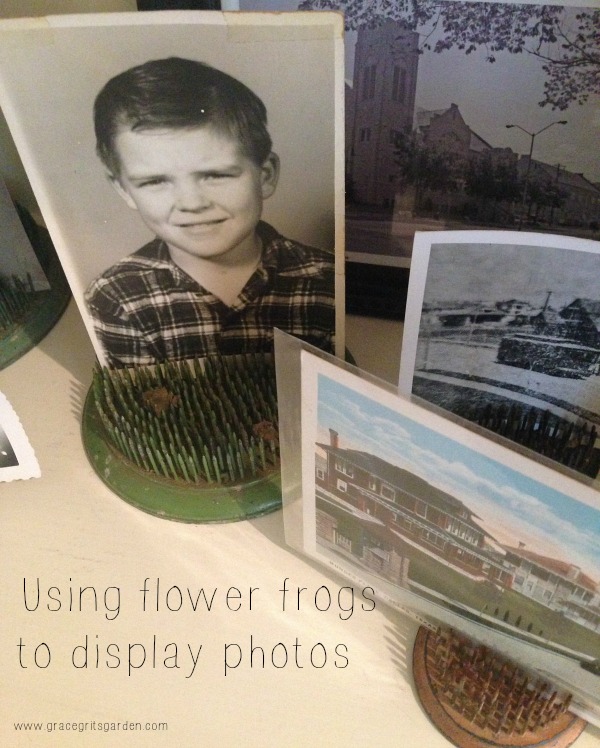
Vintage flower frogs are made of metal or pottery. They were originally used for flower arranging (very Ikebana). The frog holds the stems of flowers upright. Placed inside a shallow bowl filled with water (like a frog?), the flowers stay fresh and stand at attention. I put mine in a little creamer for demo purposes. Pretty cute I think, even though the picture didn’t turn out so great.

using flower frogs

Flower frogs have become quite collectible (pricey), so if I can find an inexpensive one, I snag it. But instead of using them for flower arranging, I prefer to use them for displaying photographs.

displaying photos with flower frog

The last few weeks I’ve been decluttering our house, preparing to sell it, preparing to move. The last thing I should be doing is buying something else to tote to our new house. Right?

Right.

Yet I was the highest (only) Ebay bidder on two new frogs. Less than five dollars, I couldn’t resist. They needed a new home, and luckily they will be easy to pack.

using flower frogs for displaying photos

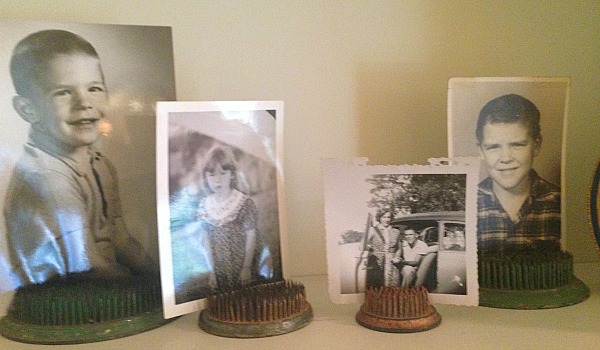
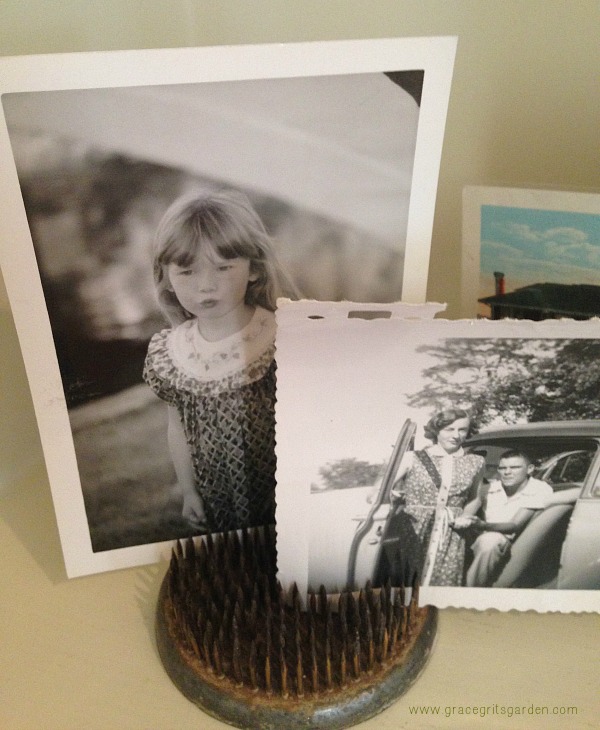
(l to r) baby John, Kelsey blowing kisses, Momma and Daddy during courting days, Daddy’s elementary pic

I love love love this simple clean look. I can easily change out the photos, and there are no frames to collect dust.

The sharp pins hold the pictures in place. I especially like antique frogs with black and white photos.

using flower frogs to display photos

Tell me, what do you collect?

Grace Grits and Gardening

Farm. Food. Garden. Life.

“The subject of the picture is always more important than the picture.”
― Diane Arbus

DIY Notepads

July 22, 2014 By Talya Tate Boerner

A month or so ago, I spent the day with my blogger friend Gina. “You should do a guest post for me sometime,” I said. “I’d love too!” she said. And drum roll… Here she is! Please welcome Gina and show her some Grace Grits love. Yay!

DIY Notepads

Hey, y’all! I’m Gina from Desperately Seeking {Gina} and I am so thrilled to be here in Talya’s space today.

If there’s one thing to know about me, it’s that I love to craft. And also, I love paper. Currently, there are no less than fifteen decorative blank notebooks and decorative journals sitting in a drawer waiting to be journal-ed, or filled with grocery lists, hopes, dreams-well, you get the idea. I love them all. Imagine my delight when I figured out how to craft my own adorable and useful notepads. Today, I want to show you how to make your own DIY notepads. I hope you enjoy, and I’d love to see your creations.

Gather:
paper
cardboard (or pieces of cut-out cereal boxes)
decorative scrapbook paper
decorative tape
PVA glue (special glue for bookbinding-dries clear and stays flexible)
Decoupage glue (I use Mod Podge)
ink pads in matching colors (optional)
foam brushes
razor knife
2 paint stirrers or 2 narrow rulers
assorted clamps (clips or C-clamps) or heavy objects to use as weights

The How-to:

DIY Notebook Steps

1. Gather supplies
2. Cut paper and cardboard to desired proportions.
3. Optional: You may add a paper-covered cardboard cover to the top (use Mod Podge to glue)or just use the decorative scrapbook paper as the cover.
4. Assemble the cover, papers, and the cardboard backing. Place paint stirrers or rulers on either side of your notepad and secure with clamps. I love these handy plastic C-clamps.
5. Apply PVA glue liberally along the top of the notepad being sure to cover the entire edge of paper, cover, and cardboard backing.
6. Allow to dry according to PVA directions, normally around 10 minutes. I added extra clamps to the middle to ensure the entire length of paper and covers were squeezed together tightly.
7. Repeat steps 5 & 6 three or four more times drying thoroughly each time.
8. For added cuteness, apply decorative tape (I used Washi Tape) to the top edge covering the clear-dried glue.
9. Ink edges in a coordinating color using stamp ink pads to finish off your notepad.

DIY Notepads


DIY Notepad

These are so fun to make! Addictive, even. Make assorted sizes with coordinating covers and stack together. Tie with pretty ribbons. These make excellent gifts for writer friends-just be sure to make plenty for yourself!

DIY Notepad

I’d love to see what you create. Connect with me at my blog Desperately Seeking {Gina} or on Facebook and see what I’m currently up to over at Instagram. Thanks so much to Talya for having me over!

Aren’t these notepads adorable? Thanks Gina!!

Gina and Talya at Moss Mountain Farms

#Palsies

Grace Grits and Gardening

Food. Farm. Garden. Life.

How to make a clover bracelet

June 17, 2014 By Talya Tate Boerner

how to make a clover bracelet

A few weeks ago I posted a photo of clover on my Facebook page. It was a popular picture, bringing lots of comments about playing in clover patches and making clover bracelets and necklaces. But I was surprised to learn there were people who had never heard of this childhood ritual.

Last week at the Hemingway-Pfeiffer writer retreat, our conversation turned to the importance of telling our stories. Stories that will soon be lost if left untold. Things that today’s kids may not know.

Like making homemade ice cream. Pouring ice and salt around the canister. Turning the crank until it wouldn’t churn. Covering the freezer with a thick towel. Waiting and waiting for fresh peach ice cream. The process was one of the best parts of summer.

And making clover necklaces and bracelets? I decided I’d better write about it. It’s worth remembering.

Step One. On a sunny spring day, gather clover.

How to make a clover necklace

Step Two. Press a small slit in the stem of the first clover about an inch from the flower. The stems are tender, so this can easily be done with your fingernail. Ideally, clover necklaces are made on the school playground surrounded by best friends, laughter and daydreams. No utensils required…

How to make a clover necklaceStep Three.  Thread the stem of a second clover through the slit of the first stem. Repeat this process, making your next slit on the second clover. Weave the third clover through the slit on the second clover. Don’t overthink. Remember, this is a fun, easy, imperfect activity.

how to make a clover bracelet

Step Four. Continue until your clover rope has reached the size you want for a bracelet, necklace or crown. Yes, clover crowns were all the rage on the Keiser Elementary School fourth grade playground…

Step Five.  Connect the last clover to the first stem the same way, with a small slit. Now your clover ring is connected. Snip the long pieces of stem if you prefer.

how to make a clover bracelet

I doubled my clover chain bracelet and proudly wore it to lunch.

Grace Grits and Gardening

Farm. Food. Garden. Life.

To make a prairie it takes a clover and one bee,
One clover, and a bee,
And revery.
The revery alone will do,
If bees are few.
(Emily Dickinson)


« Previous Page
Next Page »


Hi! I'm Talya Tate Boerner. Writer, Reader, Arkansas Master Naturalist / Master Gardener, Author of

THE ACCIDENTAL SALVATION OF GRACIE LEE (2016)

GENE, EVERYWHERE: a life-changing visit from my father-in-law (2020)

BERNICE RUNS AWAY (2022)

THE THIRD ACT OF THEO GRUENE (coming 2025)

Recent Ramblings:

  • Sunday Letter: 11.23.25
  • Maggie and Miss Ladybug: My New Children’s Nature Book
  • Sunday Letter: November 9, 2025
  • Sunday Letter: Oct 26, 2025
  • Sunday Letter: Oct 5, 2025

Novels:

Coloring Books:

Fiction-Themed Coloring Books

Backyard Phenology:

Children’s Nature Book:

Never miss a blog post! Subscribe via email:

Looking for something?

Categories

All the Things!

A to Z April Blog Challenge Autumn BAT Book Reviews childhood Christmas creative writing prompt Dallas Desserts Fall Fayetteville Food Gracie Lee Halloween Hemingway-Pfeiffer holiday recipes home humor Johnson Family Keiser Lake Norfork Lucy and Annabelle Mississippi County Mississippi Delta Monarch butterflies Munger Place Nana nature Northeast Arkansas Northwest Arkansas Osceola poem Reading Schnauzer simple living simple things spring spring gardening Summer Talya Tate Boerner novel Thanksgiving The Accidental Salvation of Gracie Lee Thomas Tate Winter Wordless Wednesday

Food. Farm. Garden. Life.

THANKS FOR READING!

All content and photos Copyright Grace, Grits and Gardening © 2025 · Web Hosting By StrataByte